I have been very fortunate in that so far, neither of my girls have any food allergies (nor do hubby or I!). My young niece, on the other hand, has not been so lucky, and cannot eat nuts or eggs. Because she is often placed in the unfair position of not being able to share foods being enjoyed by others, we try to make family get-togethers as seamless as possible so that at the very least, any unsafe foods are easy to avoid and not something she'd really want to eat anyway.
While nut allergies are certainly scary, we have found that with some careful ingredient checks, they are fairly easy to avoid when cooking at home. Eggs, on the other hand, are in everything, especially dessert! The good news is with the rise of both egg allergies and veganism, it's getting easier and easier to find ideas for egg free recipes. I've had success so far with cookies and cupcakes (recipes to come!), but one of the most elusive desserts has been brownies, since eggs are really integral to the texture. I love rich chocolate desserts, though, and after a few holidays with some version of chocolate mousse/pudding made without eggs, I was really antsy for a true brownie that we could all share.
So off to the internet I went, and found a recipe on a vegan website promising the "ultimate" brownie, which got some strong reviews. I gave it a try mostly as written (only eliminating the walnuts and subbing real buter for the vegan "butter") and found the texture to be great, but the flavor severely lacking. They looked like brownies, but barely tasted like chocolate! So even though baking chemistry is not my specialty and I am especially inexperienced with vegan-style baking, I decided to take a chance on some modifications. Miraculously, the second batch was delicious! I still think I prefer my one bowl brownies, which are incredibly rich and smooth, but these are certainly a great alternative if you have any need for an egg-free version - they are dense, with a fudgy texture and rich chocolate flavor. Plus, they even have a great crust on top.
And as an added bonus, since I made this recipe 4 times in 1 week, I came up with some ways to streamline the process from the original, which was pretty fussy, so now they're not even complicated to make. Enjoy, and let me know what you think!
Brownies (Egg-free!)
adapted from Vegan Baking
7 tablespoons water (this is 1 tablespoon short of 1/2 cup)
2 tablespoons golden flax meal
2 ounces good quality dark chocolate (I used 70%), chopped into ½ inch pieces
6 tablespoons butter, cut into pieces
1 1/2 cups granulated sugar
1/2 cup cocoa powder
3/4 teaspoon salt
2 teaspoons pure vanilla extract
1/2 cup dark chocolate chips (or more chopped chocolate pieces)
1 1/2 (rounded) cups all purpose or white whole wheat flour
1/4 teaspoon baking soda
In a small bowl or measuring cup, mix together water and flax meal, and let it sit (and gel) while you prepare the rest of the ingredients.
Line an 8x8 baking pan with parchment paper, leaving some overhang on 2 sides so that you can easily remove the brownies when they're done (or just grease your baking pan!). Preheat the oven to 350.
Melt the butter and chocolate together over a double boiler* or in the microwave, stirring occasionally, until just melted. Remove from heat and mix in sugar until thoroughly combined. Then add cocoa powder, salt, vanilla, and water/flax mixture and mix well (I used a silicone spatula, but you could use an electric mixer at this point if you prefer). Check to make sure your mixture isn't warmer than room temperature, and then gently stir in chocolate chips (if your mixture is too warm and your chocolate chips melt, no biggie, you'll just have extra fudgy brownies without chocolate chips!).
Next, add the flour and baking soda to the chocolate mixture. Use a spatula or a spoon (or even your hands if needed) to incorporate all of the flour. The batter will be VERY thick, more like a dough.
Dump batter into your prepared pan, using a spatula or your hands to spread it out evenly. Bake for 28 minutes. Remove to a cooling rack, leaving the brownies in the pan for at least an hour, and then remove brownies to the rack to cool the rest of the way.
Makes 16-20 smallish brownies
To double recipe, use a 9x13 pan and bake for an extra 3-4 minutes.
*Not sure what a double boiler is? Find a heat-proof bowl, either metal or tempered glass, that fits securely on top of one of your pots. Put 1-2 inches of water in the pot, heat until barely simmering, and then place your bowl on top with the butter and chocolate. The indirect heat of the steam on the bottom of the bowl will melt them gently without burning the chocolate. If you use a big enough bowl, you can continue with the rest of the recipe right in the same bowl!
Friday, September 21, 2012
Friday, September 14, 2012
Zucchini Fritters
As a follow up to my previous Chocolate Chip Zucchini Bread recipe, I wanted to share with you my other favorite use for extra zucchini - fritters! I just tried this recipe for the first time last month, and I think I've made 4 batches since then. This one is great if you have TONS of zucchini, since this recipe, which calls for 4 zucchini, doesn't even make a huge batch. I think I can eat an entire zucchini's worth without even blinking! The other benefit of this recipe is that they freeze perfectly, just needing to be reheated in the oven when you're ready to use.
These fritters are perfect as a side dish with any meal, but I also love to serve them with poached eggs on top for a delicious, complete, simple dish. As an alternative, you could serve them with apple sauce, sour cream, or even tomato sauce - they are really incredibly versatile. So make a double batch, freeze leftovers (if you have any!), and enjoy the taste of summer whenever you feel like it :)

Zucchini Fritters
adapted from Smitten Kitchen
2 pounds (about 4 medium) zucchini
1/2 medium onion
2 teaspoons sea salt
2/3 cup whole wheat flour (I used white whole wheat)
1 teaspoon baking powder
2 eggs
1 teaspoon baking powder
2 eggs
Freshly ground black pepper
Oil (choose one that is stable at high heat, like coconut or sunflower), for frying
(If you want to have multiple batches hot at the same time for serving, preheat your oven to 200 degrees.)
Trim ends off zucchini and grate both zucchini and onion either on the large holes of a box grater or food processor.
In a large bowl, toss mixture with salt and set aside for 10 minutes. Wring out the mixture by wrapping it in a clean dishtowel and twisting over the sink. Try to get as much liquid out as possible, as too much liquid will make your fritters soggy.
Return zucchini and onion to the bowl. Stir in the egg, flour, baking powder, and pepper, plus some additional salt if you think it's needed.
Heat a shallow layer of oil in a large heavy skillet over medium heat until oil is shimmering. Drop small scoops of zucchini mixture into the pan (I used my 2 tablespoon scoop) and flatten slightly. Cook for a few minutes until the bottoms are nice and brown, then flip and cook on the other side until brown. Drain on paper towels and then, if you'd like, place on a baking sheet in your warm oven until you are ready to serve (this also helps to crisp them up, and Deb at Smitten Kitchen recommends this step, but I think they are delicious straight from the pan as well!). Repeat process, adding oil to the pan as needed, with remaining mixture.
Serve with your choice of topping - fried or poached egg, apple sauce, sour cream, a sprinkle of salt, or anything else that sounds good to you!
Make ahead: These fritters keep well in the fridge or freezer (for best results, freeze on a baking sheet, then transfer frozen disks to a bag and seal well). Reheat on a baking sheet in a 325 oven until hot all the way through.
Makes approximately 16-18 fritters
Wednesday, September 12, 2012
Chocolate Chip Zucchini Bread/Muffins (Whole Wheat)
People like to talk about seasonal food, but with modern transportation and grocery stores, it's sometimes easy to forget that most of us do not live in an area where a wide variety of produce grows year-round. And yet even though you can pretty much always get things like lettuce, carrots, bananas, and apples, in my area there are a few staple items that stand out during the seasons. Like zucchini. In the winter you might be able to find a couple of sad looking zucchinis on the shelf, but in the summer it seems like they are growing from every corner! Whether it's the grocery store, the farmer's market, your CSA, or your garden, in some parts zucchini seems to be unavoidable in late summer. Personally, zucchini is not my favorite vegetable, but I like it enough and find myself buying entirely too much. Luckily, I have a few go-to recipes to use it up, both for easy meals and some freezer items for those winter days when we actually start to miss them again!
My favorite easy zucchini dinner is as part of a pasta toss - sauté some zucchini in olive oil, seasoned with salt, pepper, and basil...add some grape tomatoes if they're around...squeeze a lemon over the mixture once it's soft, along with a spoonful or two of tomato sauce, and add a ladle full of pasta cooking water to make more of a sauce if needed. Serve over whole wheat pasta - so yummy!
But when it comes to storing the zucchini for the longer term, I have two other favorite recipes to share. The first one up is this chocolate chip zucchini bread recipe I came across a few weeks back (hat tip to my friend Amanda at Vintage Savoir Faire!). You might remember me mentioning this as one of our road trip snacks, and let me tell you, it is delicious! Even packed with whole wheat and zucchini, this recipe is definitely a treat - sweet, moist, chocolaty (note that I've included amounts for slightly reduced sugar and chocolate if you want to make these a little less dessert like - I've tried both variations and the healthier version is just as delicious!). Perfect for preserving some of that summer zucchini, if they last - I just made my third double batch because we just can't seem to keep these around. I'm going to hide some of these in our extra freezer in the basement to see if we can make them last a little longer this time!

Chocolate Chip Zucchini Bread/Muffins (Whole Wheat)
adapted from King Arthur Flour
2 large eggs
1/3 cup honey (can reduce to 1/4 cup)
1/3 cup brown sugar (can reduce to 1/4 cup)
1/2 cup vegetable or melted coconut oil
1 teaspoon pure vanilla extract
2 cups white whole wheat flour
1 teaspoon salt
1/2 teaspoon baking soda
1/2 teaspoon baking powder
1 teaspoon ground cinnamon
2 cups shredded, unpeeled zucchini (about 1 medium zucchini)
1/2-1 cup dark chocolate chips (depending on how chocolaty you want it)
3/4 cup chopped walnuts (optional, I omitted)
Preheat the oven to 350. Lightly grease a 9" x 5" loaf pan or muffin tins.
In a large mixing bowl, whisk together the eggs, honey, oil, sugar, and vanilla until smooth. Add the flour, salt, baking soda, baking powder, and cinnamon, mixing with a spoon until well combined. Stir in the zucchini, chocolate chips, and nuts (if using).
Pour the batter into the prepared pan. Bake 55 to 60 minutes for bread, or 15-20 minutes for muffins (this will vary depending on what size muffin tins you use!), until bread/muffins are completely set on top, feel a little firm to the touch, and a tester inserted into the center comes out without any batter (a little melted chocolate is ok!).
Cool bread for a few minutes in the pan before removing to a rack to finish cooling completely.
Loaf of bread will keep well wrapped in foil for a few days on the counter, or stored long-term in the freezer. Muffins that will not be eaten within a day or 2 are best kept in the freezer and thawed in the microwave or on the counter.
Makes one loaf, 12 standard muffins, or a lot of mini muffins.
Thursday, August 30, 2012
Real Food on the Road
This week, since we are in the middle of our 4 week break between camp and school, hubby decided to take some long overdue vacation time to do some fun trips with the girls. Given that they are only 3.5 and 1.5 and are not particularly flexible about sleeping away from home, we planned carefully with only one overnight to the beach, and then a separate day trip to Sesame Place (which, for those of you who may not know, is a Sesame Street themed amusement/water park in PA for the toddler/preschool set). Sleep stress aside, for me one of the toughest parts of going anywhere with my family is how to find the right balance between allowing us to relax and enjoy the experience while not consuming so much unhealthy food that we all start to feel crappy and I feel guilty about what my kids are putting into their bodies. Feeding my kids wholesome food at home is a manageable challenge, but taking that philosophy on the road seriously ups the anty! Which is why I'm pretty proud of how this week went. I might not be as organized as some of the other fabulous bloggers out there (check out this and this post for some great ideas), but I think I managed to do some planning this year that made hubby and me feel pretty good about our food situation. I'm hoping that sharing my process will inspire some of you to do a little extra cooking and packing before your next big trip too!
Step 1: Prepare!
A few days before we left, I came up with a list of snacks that would feel indulgent, hold up well in the car, and also give us some much needed nutrients in between meals out and boardwalk snacks. I settled on nut bars, oatmeal flax cookies, brownie bites, and chocolate chip zucchini muffins. We don't usually eat all of these foods in a single day, but I thought it was important to have things that the kids would happily eat quickly and that did not need a lot of prep before serving. I made big batches which went straight into the freezer until it was time to pack.
Step 2: Pack!
Ok, so generally when you think about packing for a trip, you probably think about clothing, right? Or maybe toys and other gear if you have little kids like me? Well, for me that's the easy part...the bulk of my time is in figuring out how to pack up the food! For this week, I did really well fitting in our small cooler, which is good because we also needed to fit suitcases, a pack 'n play, blow up mattress, double stroller...you get the idea! Take the time to think through what food will serve you best, and don't forget a large bottle of ice water, a small multi-purpose knife (in a sheath or wrapped well in a thick towel), and a small cutting board.
Step 3: Enjoy your healthy food!
Here's how we did on our 2 mini-trips:
For our overnight to the beach, I included all of the snacks listed above, a block of organic cheddar, apples, water, a knife, and a cutting board. This got us through snacks when we got to our hotel mid-morning and in the afternoon when we got back from the beach, a pre-breakfast snack (since my kids are up at 6am, long before any real breakfast place opens!), and as a supplement to a lunch in a bagel place, where we bought whole wheat bagels, an organic green juice (such an exciting find!) and water. We topped the bagels with some of the cheese from our cooler.
For our day trip to Sesame Place, our plan was to do the character breakfast where the kids would get to be up close and personal with Elmo and a bunch of his friends. This had the advantage of getting us into the park early, but the disadvantage of starting our day with a decent amount of really crappy food (donuts, french toast sicks, tater tots, etc.), so I wanted to make sure we had some good snacks and a healthy lunch to keep us going! We had zucchini muffins before leaving the house at 7am, and I packed our cooler with some of the same baked goods (nut bars and brownie bites) as the beach trip. I also included apples, cheddar cheese, peanut butter, whole grain crackers, cut up cantaloupe, grapes, and freeze-dried mangoes, plus water and my cutting board and knife of course! As it turned out, park security wasn't so excited about bringing in a knife, so we ended up having to leave that in the car and make do with a plastic knife. But after our so-so breakfast, we had a lovely lunch at a picnic table of cheese, crackers, peanut butter, apples, grapes, and melon. I saved the mangoes, nut bars, and brownie bites for a snack later in the afternoon which we ended up not staying long enough to eat, but it was really nice knowing that we could completely ignore all of the food vendors and just focus on taking the girls to the great rides, and also knowing that any weird tummy feelings were the result of spinning around and around, not what we were eating :)
On both trips, my kids seemed really happy to have familiar foods around. For better or worse, kids tend to like what they're used to, which I use to my advantage while on the road. Neither one got really excited about the crappy food at the Elmo breakfast, and especially since they are so young, they had no expectations for junk in the park or on the boardwalk at the beach. If anything, they were excited to get to have cheese and crackers for lunch! So keep this in mind as you go places with your little ones - sometimes it is the parents who think junk food are part of the experience, but kids aren't born with this expectation and might even be relieved to have some foods that make them feel good while going to unfamiliar places.
Do any of you have other suggestions for eating good quality food on the road? I'd love to hear your ideas in the comments!
Thursday, August 23, 2012
Shhh...it's a secret...
Can you keep a secret? I have a confession to make...
I don't like farmer's markets.
There, I said it. Oh, you couldn't hear me? Ok, this is a little hard to admit, but I'll try again...
I don't like farmer's markets :(
Heresy, I know...I care a lot about real food and the environment, and farmer's markets are supposed to be the magic answer to supporting local business, reducing environmental impact, and getting the freshest, most delicious seasonal food. I should be the type of person who takes my family every weekend and has a wonderful time chatting with farmers and picking out our food for the week. Except in reality I have a really hard time finding my place in the farmer's market world for a few reasons.
First, most of the farmer's markets near me carry very little organic produce. I am strongly committed to organics due to the health and environmental impact, I guess more than I'm committed to local. I know that industrial organic might not be ideal either, but at the same time I find it really hard to buy non-organic produce at a farmer's market when I can go to Whole Foods whenever I want and have a huge selection, often for a better price.
I also find them to be very overwhelming. It's a completely different way of shopping than what I'm used to, and I just don't know what I'm supposed to do. How do I carry my stuff? Do I have enough cash, or can I pay with credit card? Where do I start? Which are the best stands? I know people say to talk to the non-organic farmers about their growing practices to see if they're really organic in spirit, if not certification, but I'm not very comfortable starting up conversations. I find myself wandering in circles trying to find the best stand to shop from, annoyed that the meat being sold doesn't say anything about being pastured or grass-fed, arguing with my kids about when we can buy the cookies and juice for sale, and stressed out about whether I just dragged my whole family here on a weekend to go home empty handed. Then I feel guilty for not enjoying our time there and for wishing I was just in Whole Foods.
Anyone else with me on this?
I know that like many other changes in my life it just takes practice to build up comfort - trying a few different markets, building up the courage to start those conversations, and learning my rhythm. Just like cooking from scratch and becoming a parent, big changes in our lives require patience and a slow learning curve to become second nature, and I am determined to learn to appreciate the beauty of the farmer's market, a concept that I love in theory!
So, in an effort to keep learning, last weekend we decided to try a new market about 20 minutes from my house. And at that market there was a gigantic stand of 100% certified organic New Jersey produce with a huge selection and good prices. It was like I struck gold! I still wandered in circles for a bit while hubby chased the kids (who were chasing all of the dogs!), trying to figure out how much I could reasonably buy and use in some form before the food started to go bad. I ended up with 2 baskets of cucumbers, a big basket of zucchini, a bunch of basil, 2 eggplants, a big watermelon, some heirloom tomatoes, and a 25 lb box of roma tomatoes that was an amazing deal*.
Did you read that last line? 25 POUNDS OF TOMATOES! Oh, boy...after getting some great ideas from some of you who follow my facebook page, I am still working my way through that box. I'm hoping to have a collection of ideas for you all to try if you happen to find yourself with an abundance of tomatoes as well, along with what I did with the rest of my loot. In the mean time, I am thrilled to have finally had a positive experience at a farmer's market, and am hoping to make many more trips this season. I'll keep you posted!
*By the way, in case you were concerned, we did also leave with a whole grain chocolate chip scone, double chocolate cookie, and chocolate walnut oatmeal bar. And a 5 pound bottle of local honey :)
Wednesday, August 22, 2012
100% Whole Wheat Hamburger Buns AGAIN! (Bread Machine)
Hi everyone! Just wanted to quickly share a recipe I've made several times this summer. I know I already have a 100% Whole Wheat Hamburger Bun recipe on the site, but that recipe has a few ingredients that are a little more processed than I prefer (e.g., dried milk, potato flour, vital wheat gluten) and also might be harder to have on hand. So here's another variation that I have been very pleased with!
Normally it's best to stay away from pastry flour when it comes to making bread - pastry flour is lower in protein (gluten), which helps form the stretchy bonds that gives bread its wonderful chewy texture. So conventional wisdom says to use high protein flour for bread, and to reserve pastry flour for more tender baked goods like muffins or pancakes. However, the best hamburger buns are more soft than chewy, so I think the combination in this recipe achieves a fabulous result without the need for the add-ins! I've posted my bread machine version below, but if you do not have a bread machine, follow the link back to Deliciously Organic to find alternate instructions.
Homemade Whole Wheat Hamburger Buns
adapted from Deliciously Organic
1 cup water
3 tablespoons milk (whole, or whatever you have on hand)
2 tablespoons honey
1 large egg
2 cups (white or regular) whole wheat flour
1 1/2 (rounded) cups whole wheat pastry flour
1 3/4 teaspoons fine sea salt
2 1/2 tablespoons unsalted butter, cut into pieces
2 teaspoons SAF instant yeast
Optional
1 egg and sesame seeds
Add ingredients to your bread machine pan in the order prescribed by your manufacturer. Set machine for dough cycle. If you have a chance, check the dough a few minutes after it starts kneading. If it seems very sticky and is not coming together in a cohesive ball, sprinkle in a little more flour (1-3 teaspoons) until it just comes together.
Prepare a large baking sheet by lightly greasing or covering with a silpat or parchment paper.
After the dough cycle is complete, turn the dough out on a work surface, very lightly floured if the dough is very sticky - but be careful not to add too much more flour into the dough. Using a pastry scraper or large sharp knife, divide the dough into 8-10 pieces, depending on if you want larger or smaller buns (I tend to go with smaller ones).
Form each piece into a bun by flattening into a disk about 3/4 inch thick, and working your way around pinching the edges into the center until it is round and smooth on one side (for pictures of what I mean here check out this post, which also has instructions for making hot dog buns!). Place bun seam side down evenly spaced on your prepared baking sheet.
Cover with a clean dish towel and let rise 1-2 hours until nicely puffed up. While the buns are rising, preheat the oven to 400, and when they are ready, bake for 12-14 minutes until lightly browned on the tops and bottoms. (Optionally, before baking, brush with a beaten egg and sprinkle with sesame seeds.)
Remove hot buns to a cooling rack to cool completely before slicing. Store leftovers in the freezer, defrosting on the countertop for a couple of hours.
Makes 8 large or 10 medium-sized buns
Saturday, August 18, 2012
Granola
If you're going to make yogurt at home, doesn't it follow that you need to make granola to go with it? Well, maybe not, but there are a lot of good reasons to make your own granola. You come out way ahead cost wise, but in my opinion the most important one is that you control the ingredients, meaning you can adjust the quality, types, and amounts to suit your tastes and values. For example, nuts are a food that I'm always trying to integrate into my diet, but I just don't enjoy them on their own. Instead, I use them in pesto and on salads, and granola is another great way to eat more! But most store-bought varieties have a much higher proportion of oats and other filler cereals, so I love being able to make my own with a large amount of nuts. Another problem with store-bought granolas is that they tend to be super-high in sugar (read this post for more on why excessive sugar is a problem). My version uses enough honey to make it a little sweet, but keeps it at a very reasonable level. I can also chop the nuts very finely to make it easier for my toddler to chew and less objectionable for my preschooler who has recently decided she no longer likes nuts. And of course by making my own I can use all whole, organic ingredients and not worry about anything else being in there that I'd prefer to avoid!
You might have different priorities and taste preferences than me, so please feel free to take these proportions of wet to dry and make the recipe your own! For example, you can add dried fruit, flax seeds, or chia seeds (after baking!)...use maple syrup instead of honey...leave your nuts in bigger chunks or use different nuts or seeds entirely...add cinnamon or vanilla...whatever makes you happy! For even more ideas, click on the link for the original recipe and have fun experimenting!

Granola
Preheat the oven to 325.
In a large bowl, mix together all of the dry ingredients. Measure the honey and coconut oil together in a glass measuring cup and microwave on high for 1 minute (alternatively, gently heat on the stove until both the oil and honey are very liquidy). Pour over oat mixture and mix very well until all dry ingredients are lightly coated.
Spread on a large baking sheet with sides (e.g., a half sheet sized jelly roll pan). Bake for 10 minutes, remove from oven, and stir. Place back in the oven, taking out to mix every 5-10 minutes (depending on how fast it's cooking) until everything is evenly toasty brown, approximately 30 minutes total. The granola will crisp up as it cools, so judge done-ness based on color.
Cool completely on baking sheet, and store in an airtight container at room temperature for a few weeks or in the freezer for long-term.
Makes approximately 6 cups
You might have different priorities and taste preferences than me, so please feel free to take these proportions of wet to dry and make the recipe your own! For example, you can add dried fruit, flax seeds, or chia seeds (after baking!)...use maple syrup instead of honey...leave your nuts in bigger chunks or use different nuts or seeds entirely...add cinnamon or vanilla...whatever makes you happy! For even more ideas, click on the link for the original recipe and have fun experimenting!

Granola
adapted from My New Roots
3 cups rolled oats
1/2 cup raw almonds, chopped very finely (I use a food processor for this)
1 1/2 cups raw walnuts, chopped finely
3 cups rolled oats
1/2 cup raw almonds, chopped very finely (I use a food processor for this)
1 1/2 cups raw walnuts, chopped finely
1 cup shredded unsweetened coconut
1/4 tsp. finely ground sea salt
1/4 tsp. finely ground sea salt
1/3 cup honey (local or from a trusted source)
1/4 cup coconut oil (virgin, unrefined - you could substitute another oil if you prefer, but I love the taste and health benefits of coconut!)
1/4 cup coconut oil (virgin, unrefined - you could substitute another oil if you prefer, but I love the taste and health benefits of coconut!)
Preheat the oven to 325.
In a large bowl, mix together all of the dry ingredients. Measure the honey and coconut oil together in a glass measuring cup and microwave on high for 1 minute (alternatively, gently heat on the stove until both the oil and honey are very liquidy). Pour over oat mixture and mix very well until all dry ingredients are lightly coated.
Spread on a large baking sheet with sides (e.g., a half sheet sized jelly roll pan). Bake for 10 minutes, remove from oven, and stir. Place back in the oven, taking out to mix every 5-10 minutes (depending on how fast it's cooking) until everything is evenly toasty brown, approximately 30 minutes total. The granola will crisp up as it cools, so judge done-ness based on color.
Cool completely on baking sheet, and store in an airtight container at room temperature for a few weeks or in the freezer for long-term.
Makes approximately 6 cups
Tuesday, August 14, 2012
Homemade Yogurt
One of the most common foods I see parents feed to babies and young children is yogurt. And while I agree that the probiotics and other nutrients are great for little ones, I am a bit confused by the popularity of sugar and additive filled varieties specifically marketed to kids. Have you ever looked at the ingredient lists on some of these yogurts? Many are a mile long, with tons of sugar, flavorings, stabilizers, and colors.
I know some of you are wondering, "what's so wrong with sugar"? When I was growing up, sugar was considered to be "empty calories", meaning not necessary, but also not inherently harmful. Unfortunately, recent research is suggesting that sugar might not be so innocent after all. Some of the findings include links to Type II diabetes, weight gain, unhealthy cholesterol levels, heart disease, and tooth decay. In fact, some argue that sugar possesses addictive qualities similar to cocaine! Do I think that sugar is evil and we should avoid it at all costs? No, but I do think there's enough evidence that it's potentially harmful to make efforts to consume it in small amounts and reserve sugary foods for occasional treats.
So how much added sugar should we eat? According to the American Heart Association, children should have no more than 3 teaspoons, women 6 teaspoons, and men 9 teaspoons per day. And how much do we actually eat? Here are some reference points for "healthy" foods:
None of these foods have natural sugars in them, so the amount of added sugar is easy to calculate (take the sugar grams on the nutrition label and divide by 4 to get the number of teaspoons). But foods like yogurt are a little more complicated because of the naturally occurring sugar (lactose) in the milk. So to figure out how much extra sugar there is, I compared Stonyfield Farms plain yogurt with their vanilla version. How many extra teaspoons of sugar do you think there are beyond the naturally occurring sugar present in plain yogurt? I'll give you a minute to guess. Think about if you had plain yogurt and were adding spoonfuls of sugar to sweeten it.
The answer is that there is a whopping FOUR TEASPOONS of added sugar in 1 cup of vanilla yogurt. That's more than a child should have in a whole day, and more than the amount in three Oreo cookies. (Note that it's possible that fruit flavored yogurts have slightly less added sugar due to the natural sweetness of the fruit, but most fruit versions have sugar listed long before fruit in the ingredient lists, and may only contain fruit in the form of fruit juice concentrate, aka sugar!). Do you think you actually need 4 teaspoons to make plain yogurt enjoyable? I highly doubt it, but food manufacturers know that for most people, the sweeter the better, and they can sell more product if they load it up.
The impact of this is twofold - first, if you believe the research demonstrating that sugar is actually harmful to our bodies, you are contributing to long term health issues by serving this food which is generally perceived as healthy. And second, foods like this train our tastebuds to prefer sweet foods, meaning not only do we need increasingly sweeter foods over time to satisfy cravings, but naturally sweet foods like fruit become less exciting, and bitter or more complex flavors are even less appealing. This is incredibly important as we try to help our children develop a taste for a wide variety of real foods, since something as simple as serving flavored yogurt might be undermining our efforts to teach our children to enjoy fruits and vegetables.
If I've convinced you that flavored yogurt might not be the best choice, let's talk about where to go from here. The obvious answer is to buy plain yogurt and sweeten it at home if necessary. I'd be willing to bet there are very few people (even kids!) who would need 4 full teaspoons of sugar in every cup to make it enjoyable - a spoonful of honey or maple syrup, jam, or even some fresh or frozen fruit can make a big difference. By sweetening at home, you know exactly what you're getting, plus over time you can slowly reduce the amount and learn to appreciate the tangy creamy taste of the yogurt itself.
So if it's that easy to just buy plain yogurt, why would I recommend taking the next step and making it at home? Well, for one thing, it's pretty cool to see milk turn into yogurt! But that aside, there are 2 other really good reasons to make it yourself - cost and quality.
First, cost. The (admittedly pricey) organic whole milk from grass-fed cows I buy is $6.29 per gallon, or $0.39/cup. From the same store, a quart of Stonyfield Farm Organic Plain Yogurt is $3.89, or $0.97/cup - more than double the price! Now if you're buying the individually packaged YoBaby cups, the price at my store is $2.69 for 4 4-oz cups, or $1.34/cup, more than triple the price of the homemade version. My family goes through a lot of yogurt, so this is a real savings for us over time.
Second, quality, which is a direct follow-up to cost. Even the organic plain yogurt in the store often still contains additives (thickeners, stabilizers, etc.) and is certainly not made from grass-fed milk, which is more nutritious. So I am able to buy the best quality milk I can, skip the additives, and still pay a third of the price of the YoBaby, all for a few extra minutes in the kitchen. If your budget or your values do not lead you to organic or grass-fed milk, you can still save a lot of money by making yogurt yourself, possibly making room for an upgrade in quality.
If you've made it this far, I'm willing to guess you're at least intrigued enough to learn what it takes to make yogurt at home! Honestly, I could have never imagined it was so simple. While it takes about 12-15 hours total time, the active time is roughly 5 minutes. Seriously. The hardest part is just remembering that you have yogurt going in the kitchen! There are many other methods for making yogurt, including the use of thermometers or yogurt-making machines, but the process I follow is so simple and gives me at least a 90% success rate (with the 10% "fails" just resulting in thinner yogurt), so I'm not inclined to complicate at all.
I hope I've inspired you to give it a try, and please feel free to leave any questions or results in the comments!
Homemade Yogurt
What you'll need
Overview
Here's what's going to happen: heat milk until it's hot enough to kill anything you don't want in your yogurt. Cool the milk down until it won't kill the good stuff in the yogurt, but is warm enough to provide a cozy environment for your yogurt cultures to get to work. Give the yogurt cultures time to do their thing, refrigerate, and enjoy!
Details
Slow cooker method: Pour milk into a heat safe glass bowl (Pyrex glass storage is perfect here). Place bowl in slow cooker insert, cover, and turn on high. Heat milk for about 2-3 hours, until milk is forming tiny bubbles around the edge and across the top, and starting to develop a skin. It should not come to a boil, but look close. Turn off the slow cooker and remove the glass dish. Continue below photos...
Stove-top method: Pour milk into a pot and slowly and gently heat over a low flame until milk is forming tiny bubbles around the edge and across the top, and developing a skin. It should not come to a boil, but look close. Pour milk into a glass storage container.


In both cases: Let the milk cool until it definitely feels hot, but you can put your finger in without burning it (slightly hotter than what would be comfortable for a hot tub). This will take about a half hour on the counter if you stir occasionally, or else if you're in a rush you can stick it in the fridge or even an ice bath, but be careful not to cool too much! Once it's ready, mix in 1-2 spoonfuls of yogurt, and place in the oven, NOT turned on, but with the light on for 10-12 hours. You'll know your yogurt is done when it has thickened enough that it doesn't slosh around when you hold the bowl on an angle. Chill for a few hours, add your favorite toppings, and enjoy!
More notes:
I know some of you are wondering, "what's so wrong with sugar"? When I was growing up, sugar was considered to be "empty calories", meaning not necessary, but also not inherently harmful. Unfortunately, recent research is suggesting that sugar might not be so innocent after all. Some of the findings include links to Type II diabetes, weight gain, unhealthy cholesterol levels, heart disease, and tooth decay. In fact, some argue that sugar possesses addictive qualities similar to cocaine! Do I think that sugar is evil and we should avoid it at all costs? No, but I do think there's enough evidence that it's potentially harmful to make efforts to consume it in small amounts and reserve sugary foods for occasional treats.
So how much added sugar should we eat? According to the American Heart Association, children should have no more than 3 teaspoons, women 6 teaspoons, and men 9 teaspoons per day. And how much do we actually eat? Here are some reference points for "healthy" foods:
- 1 slice of Arnold 100% Whole Wheat Bread: 1 teaspoon sugar
- 1 (2-bar) pouch Nature Valley Oat & Honey Granola Bars: 3 teaspoons sugar
- 1 cup GoLean Crunch cereal: 3 teaspoons sugar
- 1 20-ounce bottle vitaminwater attention: nearly 8 teaspoons sugar
The answer is that there is a whopping FOUR TEASPOONS of added sugar in 1 cup of vanilla yogurt. That's more than a child should have in a whole day, and more than the amount in three Oreo cookies. (Note that it's possible that fruit flavored yogurts have slightly less added sugar due to the natural sweetness of the fruit, but most fruit versions have sugar listed long before fruit in the ingredient lists, and may only contain fruit in the form of fruit juice concentrate, aka sugar!). Do you think you actually need 4 teaspoons to make plain yogurt enjoyable? I highly doubt it, but food manufacturers know that for most people, the sweeter the better, and they can sell more product if they load it up.
The impact of this is twofold - first, if you believe the research demonstrating that sugar is actually harmful to our bodies, you are contributing to long term health issues by serving this food which is generally perceived as healthy. And second, foods like this train our tastebuds to prefer sweet foods, meaning not only do we need increasingly sweeter foods over time to satisfy cravings, but naturally sweet foods like fruit become less exciting, and bitter or more complex flavors are even less appealing. This is incredibly important as we try to help our children develop a taste for a wide variety of real foods, since something as simple as serving flavored yogurt might be undermining our efforts to teach our children to enjoy fruits and vegetables.
If I've convinced you that flavored yogurt might not be the best choice, let's talk about where to go from here. The obvious answer is to buy plain yogurt and sweeten it at home if necessary. I'd be willing to bet there are very few people (even kids!) who would need 4 full teaspoons of sugar in every cup to make it enjoyable - a spoonful of honey or maple syrup, jam, or even some fresh or frozen fruit can make a big difference. By sweetening at home, you know exactly what you're getting, plus over time you can slowly reduce the amount and learn to appreciate the tangy creamy taste of the yogurt itself.
So if it's that easy to just buy plain yogurt, why would I recommend taking the next step and making it at home? Well, for one thing, it's pretty cool to see milk turn into yogurt! But that aside, there are 2 other really good reasons to make it yourself - cost and quality.
First, cost. The (admittedly pricey) organic whole milk from grass-fed cows I buy is $6.29 per gallon, or $0.39/cup. From the same store, a quart of Stonyfield Farm Organic Plain Yogurt is $3.89, or $0.97/cup - more than double the price! Now if you're buying the individually packaged YoBaby cups, the price at my store is $2.69 for 4 4-oz cups, or $1.34/cup, more than triple the price of the homemade version. My family goes through a lot of yogurt, so this is a real savings for us over time.
Second, quality, which is a direct follow-up to cost. Even the organic plain yogurt in the store often still contains additives (thickeners, stabilizers, etc.) and is certainly not made from grass-fed milk, which is more nutritious. So I am able to buy the best quality milk I can, skip the additives, and still pay a third of the price of the YoBaby, all for a few extra minutes in the kitchen. If your budget or your values do not lead you to organic or grass-fed milk, you can still save a lot of money by making yogurt yourself, possibly making room for an upgrade in quality.
If you've made it this far, I'm willing to guess you're at least intrigued enough to learn what it takes to make yogurt at home! Honestly, I could have never imagined it was so simple. While it takes about 12-15 hours total time, the active time is roughly 5 minutes. Seriously. The hardest part is just remembering that you have yogurt going in the kitchen! There are many other methods for making yogurt, including the use of thermometers or yogurt-making machines, but the process I follow is so simple and gives me at least a 90% success rate (with the 10% "fails" just resulting in thinner yogurt), so I'm not inclined to complicate at all.
I hope I've inspired you to give it a try, and please feel free to leave any questions or results in the comments!
Homemade Yogurt
What you'll need
- Whole milk (organic and/or grass-fed if possible)
- 1-2 spoonfuls PLAIN yogurt (store-bought for your first batch, and the end of your existing batch once you get things going)
- Glass storage container (e.g., Pyrex) big enough to hold however much you want to make (I'd recommend 1-2 quarts at a time)
- A slow cooker OR a pot
Overview
Here's what's going to happen: heat milk until it's hot enough to kill anything you don't want in your yogurt. Cool the milk down until it won't kill the good stuff in the yogurt, but is warm enough to provide a cozy environment for your yogurt cultures to get to work. Give the yogurt cultures time to do their thing, refrigerate, and enjoy!
Details
Slow cooker method: Pour milk into a heat safe glass bowl (Pyrex glass storage is perfect here). Place bowl in slow cooker insert, cover, and turn on high. Heat milk for about 2-3 hours, until milk is forming tiny bubbles around the edge and across the top, and starting to develop a skin. It should not come to a boil, but look close. Turn off the slow cooker and remove the glass dish. Continue below photos...
Stove-top method: Pour milk into a pot and slowly and gently heat over a low flame until milk is forming tiny bubbles around the edge and across the top, and developing a skin. It should not come to a boil, but look close. Pour milk into a glass storage container.
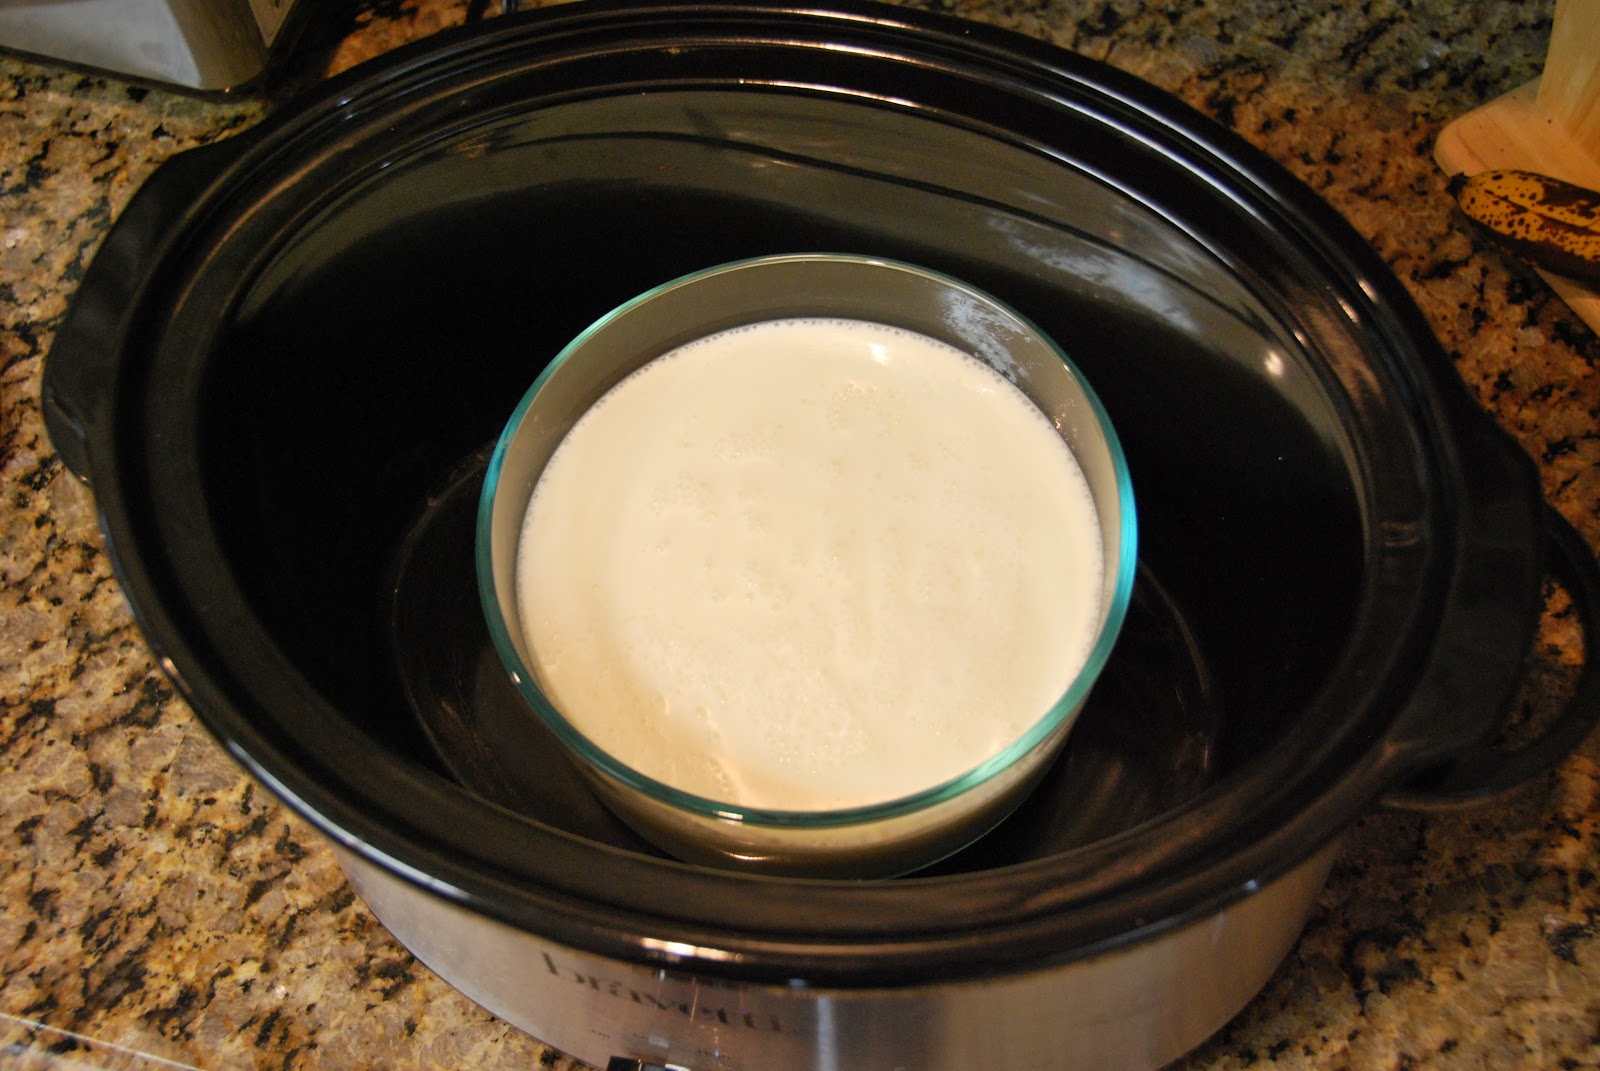
Here is the milk warming in the slow cooker...

And a close-up of the bubbles on top when it's ready to come out!
In both cases: Let the milk cool until it definitely feels hot, but you can put your finger in without burning it (slightly hotter than what would be comfortable for a hot tub). This will take about a half hour on the counter if you stir occasionally, or else if you're in a rush you can stick it in the fridge or even an ice bath, but be careful not to cool too much! Once it's ready, mix in 1-2 spoonfuls of yogurt, and place in the oven, NOT turned on, but with the light on for 10-12 hours. You'll know your yogurt is done when it has thickened enough that it doesn't slosh around when you hold the bowl on an angle. Chill for a few hours, add your favorite toppings, and enjoy!
More notes:
- This recipe can be scaled up depending on the size of your container. I generally make closer to 6 cups, and then use 2-3 big spoonfuls of existing yogurt.
- The slow cooker method has the benefit of virtually no clean up because you're heating the milk right in the container you'll eventually keep it in the fridge, but the stove top method is still pretty simple - just an extra pot to wash.
- I have 2 timetables for making yogurt: if I don't need to use my oven all day, I'll get the yogurt started first thing in the morning. It heats in my slow cooker from about 7-9:30am, cools til 10am, and then processes until bedtime, when I put it in the fridge so it will be ready for breakfast the next day. Alternatively, I can start it in the afternoon around 3, heat til 5:30, cool til 6, and then process overnight in the oven so that it's ready to go in the fridge first thing in the morning. If you are lucky enough to sleep past 6 in your house, you can push this a little later, just make sure to start heating 3 hours before bedtime. Unless, of course, you want to just heat the milk on the stovetop, which will go much faster than the slow cooker!
- If for some reason you need to use your oven before your yogurt is ready, you can put the container of processing yogurt carefully back in the slow cooker. Turn to "keep warm" for about 10-15 minutes, then either wrap the whole thing in a big towel or blanket, or if you will be in the kitchen, you can keep turning it on and off so that it stays warm but doesn't get too hot. This is a little annoying, but it works in a pinch!
- I've read that you can make yogurt with reduced fat or skim milk, but have not tried it myself! I'd recommend starting with whole milk and getting the process down before branching out, if you so choose.
- Make sure to tell everyone in your house not to finish the yogurt! After the first batch, you hopefully will not need to buy another container - just save 2-3 spoonfuls from the yogurt you made to get your next batch going.
Thursday, August 9, 2012
Reflections...
Hi everyone, sorry for the lack of recipes lately! I have a lot to share, but given the hiatus I thought it might be a good opportunity to take a step back and reflect on this blog - where it began and where I think it will be going.
For those of you who may not know, I started The Simply Wholesome Kitchen because motherhood accelerated my path toward wholesome cooking while simultaneously scattering my brain, and I could no longer keep track of my recipes. The Simply Wholesome Kitchen was born as an online recipe box with the idea that once on the internet, my recipes could no longer get lost or forgotten!
But those of you who have been unlucky enough to get trapped in a conversation with me know that as much as I love sharing recipes, my true passion is talking about the bigger picture of how these recipes fit into a wholesome lifestyle. I love learning about ways to live as cleanly as possible, including not only the food I feed my family but the products we use to cook and store food, the personal care products we use on our bodies, the products we use to clean our home, and how we use our dollars to support what we believe in. What I've learned in the last few years has changed my life in countless ways, and I'd love to share this info with anyone who is interested!
So now seems like a good time for The Simply Wholesome Kitchen to embark on a new adventure, serving as a central location for all of my favorite recipes, but also general info on food, the environment, musings on parenting, book reviews, and whatever else I feel like sharing. At the same time, hubby has decided that the website is in need of a makeover (I don't disagree!), so look for those changes in the coming months as well.
I hope this is a change that will be interesting to all of you, and I hope you will join the discussion! I'd like this site to become a place for thoughtful consideration on the best ways to live in, raise families in, and even change this world that has, in my opinion, lost its way in our drive towards efficiency and profits at the expense of simple and wholesome living.
Friday, January 6, 2012
Onion Dip
I told you all about my love for onion dip when I was a kid when I shared my version of Mark Bittman's Veggie Dip. I also shared another dip recipe - Spinach Leek Dip - which is also delicious. But sometimes nothing quite replaces classic onion dip served with potato chips - times like my munchkin's 3rd birthday party! Unless, of course, by "classic" you think I mean from soup mix, in which case this might be the first time you're reading this blog...ingredients like partially hydrogenated soybean oil, MSG, and disodium inosinate are not part of my cooking these days. But I have proven yet again that ingredients like these are DEFINITELY not necessary to make yummy treats. This onion dip, amazingly enough, gets most of its flavor from real onions. And while part of me thinks it's really sad that we've gotten to the point that people were surprised that I could make onion dip without a powder, I was also so excited to be able to share this treat with our guests, knowing that I had managed to serve delicious food without compromising my ingredient standards OR creating a ton of work for myself.
Onion Dip
adapted from Food Network
2 tablespoons olive oil
2 cups diced onions (approximately 1 large onion)
3/4 cup sour cream
3/4 cup mayonnaise
3/4 cup plain non-fat greek yogurt*
1/4 teaspoon ground pepper
1/2 teaspoon kosher salt
Heat oil in a saute pan over medium heat. Add onions and cook until they are very well carmelized, approximately 20 minutes or longer (turn the heat down if the onions start to burn - this is best done as a slow process. The onions don't need much attention, though, so plan to do this when you have other things going on in the kitchen!).
Remove from heat and set aside to cool. Mix the rest of the ingredients, and then add the cooled onions. At this point you can call the dip done, but I chose to puree using my immersion blender to create a smoother dip that was less likely to offend any 3-year-olds (or grown-ups) who might not appreciate the pieces of onion.
Refrigerate the dip overnight. Stir and adjust seasoning before serving.
* You could skip the yogurt and just use more sour cream, but I did not think the yogurt compromised the taste or texture at all, so I think it's a nice way to lighten this up a little bit. On the flip side, you could also experiment with using more yogurt to replace the sour cream and/or mayo - if you do, let me know how it goes!
Wednesday, January 4, 2012
Delicious Whole Grain Waffles
If there's one thing I've learned in the past 2 years since I started this blog, it's that homemade foods are often simpler than they appear. I grew up on Eggo frozen waffles, with the occasional homemade version from Bisquick (until one day my dad decided the ancient, caked-on waffle maker was just way too hard to clean, and into the garbage it went!). As an adult, my mom bought one of the fancy belgian waffle makers to use on ski trips, but we still used a mix and even that way they seemed like such a big deal to make. Frozen waffles, of course, are super-easy, and there are lots of brands of supposedly more wholesome varieties. But upon closer inspection, like so many processed products, it's hard to find a whole grain, organic version that doesn't have all sorts of additional ingredients like flavors, preservatives, dough conditioners, etc that I could do without. And that's not even considering the price tag!
So after about a year of doing without waffles altogether because I wasn't happy with the choices in the store, I finally decided to invest in a waffle iron. I found a recipe on All Recipes that was packed with wholesome ingredients but promised to be delicious. With a little bit of skepticism, I gave them a try on my new waffle iron and was blown away. Somehow, miraculously, these waffles are 100% whole grain, incorporate flax seed, and are LIGHT! They crisp up beautifully, are just a tad sweet, and are enthusiastically gobbled up by my 3-year-old. I would venture to guess that you could serve these to any crowd and no one would ever guess the ingredient list!
So make a double batch, throw the extras in your freezer, and enjoy wholesome AND convenient waffles any time you want!
Delicious Whole Grain Waffles
adapted from All Recipes
Dry Ingredients
Wet Ingredients
2 eggs
So after about a year of doing without waffles altogether because I wasn't happy with the choices in the store, I finally decided to invest in a waffle iron. I found a recipe on All Recipes that was packed with wholesome ingredients but promised to be delicious. With a little bit of skepticism, I gave them a try on my new waffle iron and was blown away. Somehow, miraculously, these waffles are 100% whole grain, incorporate flax seed, and are LIGHT! They crisp up beautifully, are just a tad sweet, and are enthusiastically gobbled up by my 3-year-old. I would venture to guess that you could serve these to any crowd and no one would ever guess the ingredient list!
So make a double batch, throw the extras in your freezer, and enjoy wholesome AND convenient waffles any time you want!
Dry Ingredients
1 1/4 cup whole wheat pastry flour
1/2 cup flax seed meal
1/4 cup quick oats (or wheat germ)
1 tablespoon + 1 teaspoon baking powder
1 tablespoon sugar
1/4 teaspoon saltWet Ingredients
2 eggs
1 3/4 cups milk
1/2 cup oil (may sub half for unsweetened applesauce if you wish)
1 teaspoon vanilla extract
In a medium bowl, whisk together dry ingredients. In a large bowl, whisk together wet ingredients. Pour dry into wet and quickly whisk just until combined. Allow batter to sit while preheating waffle iron. Pour batter into waffle iron in batches according to manufacturer's directions, and cook until crisp and golden brown. Serve immediately, or let cool, freeze in a zip-top bag, and reheat in the toaster whenever you want.
Makes 11 waffles (1/2 cup batter each)
Makes 11 waffles (1/2 cup batter each)
Subscribe to:
Posts (Atom)