Thursday, December 30, 2010

The Pizza Story (4) - The Trials and Tribulations of Making Pizza!

If you are just joining this story and interested in reading my previous ramblings, check here :)

After wrestling with my food processor and struggling with an incredibly sticky dough, it was finally time to try to make pizza. After an overnight rest, I pulled out my dough balls from the fridge when the munchkin ate dinner at about 5:30. After her 6:30 bedtime I got to work stretching out the first pizza while the stone preheated in the oven. The stickiness was a factor yet again, but after a little work I was able to create a sort-of round base for my pizza. The recipe recommended using the back of a sheet pan in the absence of a pizza peel (definitely no room for that in my apartment!), but I only had one with low sides, and I think that was not an appriate substitution. I also didn't use nearly enough corn meal so when it was time to get my pizza on the stone it stuck, which meant the pizza became totally lopsided and the cheese slid off onto the pizza stone while cooking. This led to a complete mess to clean up - notice the cheese boiling on the pizza stone at the top left:


Ugh.  The second pizza I made that night didn't stick quite as badly, but still wasn't a particularly exciting outcome. 

I had frozen 4 of the 6 dough balls I made, so when it came time to pull 2 from the freezer, things went a little more smoothly.  I got better at managing the stickiness and developed my skills at stretching the dough, and came out with some pretty decent pies!  Here's one from week 2 - hubby requested his half with olives:


It looks like pizza!  And tasted like pizza!  And didn't make a mess of my pizza stone! 

I thought I was quickly getting the hang of things until it was time to try making dough again.  I was very excited to find that the second time around I didn't have nearly the same issues with the dough sticking to everything, but unfortunately that translated into it not tasting very good, either.  Instead of being springy and sticky, it tore very easily and tasted very bready when cooked, instead of the chewy/crunchy combination you'd expect from pizza.  The dough kept climbing up the center shaft while it was mixing, so I'm wondering if I didn't get a good enough knead?  Made me think that maybe the dough shouldn't have been quite so sticky the first time around, though.

One more try in the food processor, and this time not only was the machine bouncing all over the counter, but dough got into the center shaft, slowed down my motor, and caused a burning smell because it was working so hard.  Very scary!  The dough that time came out tasty again, but I started to think pizza making should be put on hold until I had access to a stand mixer. 

That opportunity came as soon as I moved in with my parents this summer.  I pulled out my mom's mixer so I could make pizza for everyone and was very disappointed to see the heavy mixer bouncing all over the counter, too - I felt like I couldn't let go of it for a second!  I tried one more time with my newer mixer when we got to the new house.  This was a little less scary; I think my mixer might be a little more sturdy, and the resulting dough was really good.  Plus, I also had a chance to try out a new cooking method - we made pizzas on the grill, which were delicious!

But with the new house I also got a bread machine, which people have been telling me for months would be great for making dough - I had to check it out!  This has turned out to be the best option yet.  I will be telling you more about my love for my bread machine in other posts, but for now let's just say that 10 minutes in the bread machine has yielded delicious dough with no kitchen appliances bouncing around my counters, and the easiest clean-up - a few measuring cups/spoons and the non-stick loaf pan and beaters.  I am totally sold on this approach, but will post the stand mixer option as well for those of you who I don't manage to convince to invest in a bread machine :)  Detailed pizza recipes will hopefully be on their way soon, including how to make dough in the stand mixer or bread machine, and how to cook pizza using a pizza stone in the oven or directly on the grill.

Friday, December 10, 2010

Butternut Squash Soup

A few years ago, I hosted Thanksgiving for the first time for a very small group - just my parents, hubby's parents, and the 2 of us.  At the time I was in a small apartment and just starting to practice my cooking skills, which led to a menu including an overcooked turkey breast, stuffing made from store-bought cornbread that was not much of a hit, and my basic smashed potatoes.  But the star of the evening was a recipe I found for butternut squash soup on Epicurious that tasted so decadent and yet was so easy and healthy!  Everyone was amazed that this soup wasn't loaded with butter and cream.  When I made it that first time for the holiday, I also made the fried sage leaves that Epicurious recommends, but have since decided that they're not really worth the effort. 

The only hard part of this recipe is peeling and cutting a butternut squash, so my solution has been to wait until I see pre-cut organic butternut squash at Trader Joe's or Whole Foods and seize the opportunity!  But this is also a great option if you have a butternut squash sitting on your counter that you don't know what to do with.  I have made it twice already this year and am hoping to make one more batch before the squash are out of season, although I also bought some canned squash puree and plan to experiment substituting it for the fresh.  I will keep you posted on how that goes, but in the mean time, if you see that pre-cut squash, pick up a couple of packages and make this soup!


Butternut Squash Soup
adapted from Epicurious

1 tablespoon butter
1 onion, coarsely chopped
1 tablespoon chopped fresh sage
1 2 3/4-pound butternut squash, halved, peeled, seeded, chopped (or about 2 lbs pre-cut)
5 cups low-salt chicken broth
1/3 cup freshly grated parmesan or romano cheese
Salt and pepper

Melt butter in heavy large pot over medium heat. Add onion; cook until soft, stirring occasionally, about 7 minutes. Add chopped sage; stir 1 minute. Add squash and broth. Increase heat to high and bring to boil. Reduce heat and simmer until squash is tender, about 25 minutes. Puree soup right in the pot using an immersion blender, or cool slightly and puree in batches in blender until smooth. Mix in cheese and season to taste with salt and pepper.

Do ahead: Can be made 1-2 days ahead and refrigerated, or frozen well in advance.

Makes 8 bowls

Tuesday, December 7, 2010

Mini Chocolate Cupcakes with Chocolate Fudge Frosting

Hi everyone!  I started the story of the munchkin's birthday cupcakes in this post, but decided the chocolate cupcakes needed a post of their own!

Whereas I was happy with a modified muffin for the vanilla version, I needed to try 2 chocolate recipes to find a winner.  The first one was from Weelicious (with whole wheat pastry flour subbed for the all-purpose).  They looked great when they came out, but were a little dry (definitely could be the result of my whole wheat substitution) and didn't have quite the chocolatey taste I was hoping for.  The second recipe from Sweet + Natural, however, was delicious, even without frosting!  They came out moist, light, and really chocolatey - almost like a souffle consistency, which makes sense given that the recipe has 3 eggs in it!  As an added bonus for some of you out there, this recipe is also gluten-free.  I am not concerned about gluten, but I did like that these muffins used high protein and high fiber coconut flour instead of whole wheat for a change.

I used the coordinating chocolate frosting recipe from the same site, but with a few modifications (see my rant on frosting here for more details!).  First, I eliminated the peppermint since I was going for a more traditional flavor.  I also decided to lighten it a bit by reducing the sugar and using neufchatel cheese (already in my fridge from the vanilla version!) in place of half of the buter.  I don't generally harp on nutrition calculations, but I think it's noteworthy that neufchatel cheese has less than half the calories and 1/4 the fat of butter, so this makes a big difference with what I would consider no compromise in taste or texture!  Let me tell you, this frosting is delicious, and so easy.  I generally don't like chocolate frosting altogether, but I could not get enough of this one, and the feedback from others was just as positive!  As some final inspiration for the skeptics out there, I'll share a conversation between two of the mommies at the party, which was overheard by hubby:

Mommy 1: Did Alissa make these cupcakes?
Mommy 2: Yeah, which probably means they're all organic and healthy...
Mommy 1: I don't care what's in them, they're delicious!

Which is exactly the reaction I was going for :)


Mini Chocolate Cupcakes with Chocolate Fudge Frosting
adapted from Sweet + Natural

Cupcakes:
1/4 cup coconut flour
1/4 cup cocoa powder
1/4 teaspoon salt
1/2 teaspoon baking soda
3 eggs
1/4 cup vegetable oil
1/2 cup agave nectar
1 teaspoon vanilla extract

Preheat the oven to 375.  Spray mini cupcake pan with cooking spray or line with mini-cupcake papers and set aside.

In a large bowl, mix together coconut flour, cocoa powder, salt and baking soda. In a separate bowl, mix together eggs, oil, agave and vanilla extract until well-combined. Add wet ingredients to dry ingredients and mix until well blended.  Pour or scoop 1 tablespoon batter into each muffin cup and bake for about 10 minutes or until a toothpick comes out clean (note: the first time I made these 10 minutes was perfect, the second time I needed 15 - no idea why, so be sure to test for doneness!).

Frosting:
1/4 cup butter, softened (1/2 stick)
2 oz neufchatel cheese
1 1/2 cups powdered sugar
1 tablespoon vanilla extract
3 tablespoons milk (any kind, dairy or non-dairy, should work)
1/4 cup cocoa powder
dash of salt

While cupcakes are cooling, prepare frosting by blending together all ingredients with an electric hand mixer until smooth. 

Once cupcakes cool, spread frosting on top.

Do ahead: I made the cupcakes a couple of days in advance and froze them in a plastic bag until the day of the party.  I also made the frosting the day before, covered it tightly with plastic wrap, and left it in the refrigerator.  Right before the party, I frosted the cupcakes straight from the freezer - they were defrosted by the time I got through the batch and everything tasted perfect!

Makes 22 teeny tiny cupcakes with extra frosting for snacking after the party another use :)

Birthday Cupcakes

I'd like to start this post by wishing my little munchkin a very happy birthday! I cannot believe it's been 2 years already, and at the same time I can't believe how grown up she is - talking and singing, jumping and climbing, and even knowing enough to get excited about her own birthday party :)

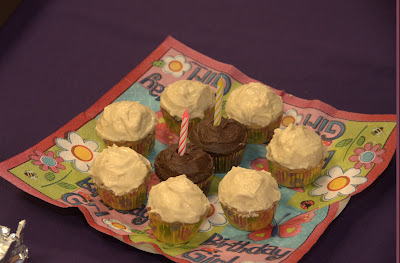
In honor of the munchkin's birthday, we hosted a small party with some of her friends at a local play space. Rather than have the party during a meal time, I decided to just serve a snack - cupcakes, pretzels, animal crackers, and water. The party place would provide all the food if we wanted, but I couldn't resist the opportunity to make some cupcakes that were a little more wholesome than what's typically served. You may recall that I also decided to make cupcakes for the muchkin's first birthday last year, but fortunately I've learned a lot about healthier baking in the past year, and was able to spare my guests hidden blueberries and spinach hidden this time ;).  After a lot of internet searching and thinking, I decided to make 2 kinds - vanilla cupcakes with vanilla frosting, and chocolate cupcakes with chocolate frosting. 


But before I get to the recipes, I wanted to share some thoughts on frosting - did you all know that frosting is actually really easy to make??  I didn't!  For most of my life, I was convinced by Duncan Hines and Betty Crocker that frosting only comes in a round container with scary ingredients.  If you don't believe me, see for yourself - here is the ingredient list for some "home-style" vanilla frosting:

Sugar, Vegetable Oil Shortening (Partially Hydrogenated Soybean And Cottonseed Oils, Mon-And Diglycerides, Polysorbate 60), Water, Corn Syrup. Contains 2% Or Less Of: Corn Starch, Salt, Colored With (Titanium Dioxide, Yellow 5, Red 40), Natural And Artificial Flavors, Rum, Caramel Color, Preservatives (Potassium Sorbate), Sodium Acid Pyrophosphate, Citric Acid, Sodium Citrate.

Ack!  How many of you have those ingredients in your home??  Impressively, this includes every ingredient category I try to avoid...trans fats (a.k.a. partially hydrogenated oils), artificial flavors, artificial colors, and preservatives.  But I believed that you have to be an expert baker to actually make frosting at home, and that it required a lot of effort.  I was SO wrong and will never go back...even without efforts to lower the fat and sugar, home-made frosting is way more wholesome in that it will include real ingredients like butter, sugar, and pure vanilla extract, and can be made in minutes by anyone who owns a mixing bowl and a hand mixer.  Plus, I have also discovered that a few tweaks can help the fat and sugar content quite a bit without sacrificing taste. 

The first trick is to use cream cheese!  Cream cheese is not exactly a low fat food, but tablespoon for tablespoon, even the full fat variety has half the fat and calories as butter, which is the traditional base for frosting.  Sub a low-fat variety (like Neufchatel) and you're now at less than half the calories and one quarter the fat of butter.  As you'll see in the cupcake recipes, I actually used a combination of cream cheese and butter so that the frosting would taste a little more traditional, but would have some of the benefit of the substitution.  The second trick is to add sugar slowly.  I found I was able to reduce the sugar in both recipes I found and still have a frosting that was plenty sweet by starting with about 1/2 to 2/3 the recommended amount and increasing only as needed.


For the vanilla cupcakes I actually just adapted 2 recipes I already have - for the base, I made my Whole Wheat Apple Muffins, eliminating the apples and cinnamon, upping the sugar to about 3/4 cup, and adding 2 teaspoons of vanilla. And for the frosting, I used the Cream Cheese Frosting from my Pumpkin Cake, but replaced 4 ounces of the neufchatel cheese with 1/2 cup of softened butter to tone down the cream cheese flavor for the little ones. Both parts of the cupcake were delicious and went over really well, but next time I will probably look for a different recipe for the base - I loved the buttery vanilla flavor, but the texture is dense and, well, muffin-y! Until they were frosted, I didn't realize how much lighter cupcakes generally are.

The chocolate cupcakes required a little more research and testing, but were a huge success!  Check this post for the complete story and recipe :)

Sunday, December 5, 2010

Pumpkin Cake with Cream Cheese Frosting

---This post is part of my Canadian Thanksgiving series---


I have to apologize, I failed as a food blogger and didn't manage to get my pumpkin cake recipe posted before Thanksgiving!  But even if you didn't have the opportunity to make this for Thanksgiving, it is still a great all-purpose recipe.  I originally got this recipe after freaking out that my frozen apple crisp was going to be inedible when I reheated it, and therefore I wouldn't have enough dessert (both of which, in hindsight, are ridiculous thoughts - how bad could apple crisp be, really, and even without it we would have had MORE than enough dessert on the table). 

In any case, I was complaining to my friend who offered up this pumpkin cake recipe which could not possibly be easier to make.  It requires one mixing bowl, a 1 cup and a 1 tsp measure, and a mixing instrument.  You seriously can't mess it up, and, while not the most healthy recipe out there, it is simple and tasty.  In the future I'd like to try lightening it up with less sugar, some whole wheat flour, and possibly some applesauce in place of some of the oil - I will let you know how it goes when I do!  But for Thanksgiving, of course, I decided to make it even more decadent by adding some cream cheese frosting, which was absolutely delicious, but not at all necessary to make the cake enjoyable.  As a side note, this frosting is incredibly easy, too.  I will have more info on frosting in a future post (my little munchkin is turning 2 and it's cupcake time!), but in the mean time, please know that it is not difficult to make frosting that is tastier and way more wholesome than anything you can buy in a tub :)


Pumpkin Cake
adapted from a friend

2 cups all purpose flour
1 2/3 cup sugar
1 cup canola oil
1 14 oz can pumpkin
4 eggs
2 teaspoons baking powder
1 teaspoon baking soda
1 teaspoon salt
2 teaspoons cinnamon

Preheat oven to 350.  Butter or spray a bundt pan or 9x13 baking dish.

Mix all ingredients in a large bowl.  Pour into prepared baking dish.  Bake for approximately 35 minutes until lightly brown on top and a toothpick comes out clean.  Remove from pan and cool completely before frosting (optional; see recipe below).

Do ahead: This cake was perfect made a few days in advance and frozen, wrapped tightly with foil.  Just defrost at room temperature, frost (if you want), and serve!


Cream Cheese Frosting
adapted from Sweet + Natural

12 ounces Neufchatel cheese
2-2 1/2 cups unrefined powdered sugar
1 tablespoon vanilla extract

Blend ingredients with an electric hand mixer until smooth, starting with 2 cups of sugar and adding more as needed to get to your desired sweetness level.  Note that you do NOT have to soften the cheese, it works just fine straight from the fridge.

Do ahead: The frosting holds up perfectly made 1-2 days in advance and refrigerated with a piece of plastic wrap on the surface of the frosting.  If you have a sturdy bowl with a lid, even better - just mix it up in that bowl, throw some plastic wrap on before putting on the lid, and refrigerate until you're ready to use!